
How to Install Metal Roofing? Step By Step Guide
Tired of feeling heat rise through the attic or hearing your roof groan during storms? That’s when most homeowners realise it’s time for something stronger. Metal roofing offers durability, fewer repairs, and peace of mind for decades. But only if it’s installed right. Misaligned panels, overtightened screws, or skipped closures can cause major issues. Not confident in a DIY? Check out our metal roofing services for expert help that gets it done right the first time.
Types of Metal Roofing

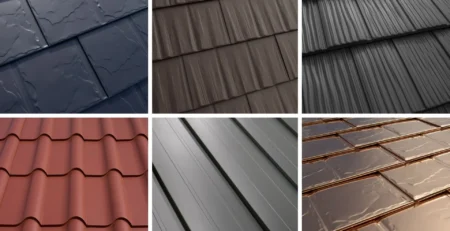
Standing Seam: Interlocking panels with raised seams for a sleek, modern look. Great for heavy rain or snow, but pricier and trickier to install.
- Corrugated: Wavy panels that are affordable and easy to work with, ideal for barns or sheds.
- Metal Shingles: Mimic traditional shingles but with metal’s durability. Perfect for homeowners wanting a classic aesthetic.
Each type has its strengths. For example, standing seam is a favourite in snowy regions like Colorado because snow slides off easily, while corrugated panels are popular in rural areas for their low cost. If you’re weighing your options, it’s worth exploring whether metal roofs are more expensive than shingles to see which fits your budget and long-term needs.
Material Choices
- Steel: Strong and budget-friendly, often coated with zinc or aluminium to resist rust. Best for most climates.
- Aluminium: Lightweight and corrosion-resistant, ideal for coastal areas like Florida, where salt air is a concern.
- Copper: Premium and long-lasting, often chosen for historic homes or high-end projects.
Why Metal? The Eco-Friendly Edge
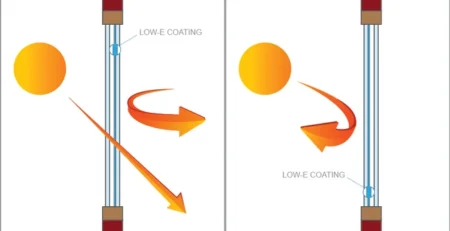
Metal roofs are often made from recycled materials and are fully recyclable at the end of their life. They also reflect heat, cutting cooling costs by up to 20%, according to the Metal Roofing Alliance. Compared to asphalt shingles, which need replacing every 15-20 years, metal roofs are a sustainable choice that saves you money and reduces waste.
Metal vs. Other Roofs
Asphalt shingles are cheaper upfront but wear out faster and aren’t eco-friendly. Tile roofs are durable but heavy, requiring costly structural upgrades. Metal strikes a balance: lightweight, long-lasting, and versatile for most homes.
Tools and Materials Needed
To install a metal roof, you’ll need the right gear. Here’s a rundown of essentials, plus tips to save money and ensure quality.
Tools
- Metal shears or nibbler: For cutting panels cleanly.
- Cordless drill with driver bit: For fastening screws.
- Safety harness and rope: Critical for steep roofs to prevent falls.
- Tape measure and chalk line: For accurate measurements and straight cuts.
- Ladder and scaffolding: To access the roof safely.
- Gloves and safety glasses: Metal edges are sharp protect yourself.
Materials
- Metal panels: Order based on your roof’s square footage, adding 10% for waste.
- Underlayment: Use synthetic or felt underlayment for water protection. In cold climates, add an ice-and-water shield.
- Fasteners: Use corrosion-resistant screws with rubber washers to prevent leaks.
- Flashing: For sealing edges, valleys, and areas around chimneys or vents.
- Drip edge: Directs water away from the roof’s edge.
Pro Tip: Sourcing Materials
Check local suppliers for deals on panels, as shipping large sheets can get pricey. Online retailers like Home Depot or metal roofing manufacturers often offer warranties, look for at least 20 years on coatings. If you’re on a budget, ask about “seconds” (slightly imperfect panels) for sheds or non-visible areas.
Preparing for Installation
A solid start sets the stage for a leak-free, durable roof. Here’s how to prep like a pro.
Safety First
Roofing is no joke, falls are a leading cause of injuries. Wear a safety harness tied to a secure anchor, especially on slopes steeper than 6:12. Use sturdy ladders, and never work in rain or high winds. Gloves are a must to avoid cuts from sharp metal edges.
Measuring Your Roof
Measure each roof section (length x width) to calculate square footage. For complex roofs, break it into rectangles and triangles, then add up the total. Multiply by 1.1 to account for waste. Double-check measurements before ordering to avoid costly mistakes.
Pre-Installation Steps
- Inspect the Roof Deck: Check for rot, mold, or weak spots. Replace damaged plywood or OSB.
- Remove Old Roofing (if needed): Strip asphalt shingles if local codes require it. Some areas allow metal over existing shingles, but check first.
- Install Underlayment: Roll out synthetic underlayment, overlapping seams by 6 inches. In snowy areas, add ice-and-water shields along eaves and valleys to prevent ice dam leaks.
- Check Ventilation: Ensure your attic has proper vents to avoid heat buildup, which can warp metal panels.
Step-by-Step Installation Guide

Now for the main event: installing your metal roof. Follow these steps for a professional-grade result, whether you’re a DIYer or a seasoned contractor.
Step 1: Install Drip Edge and Underlayment
- Nail a metal drip edge along the eaves to direct water into gutters.
- Lay underlayment over the entire roof, securing it with cap nails. Overlap seams by 6 inches and tape them for extra waterproofing.
- Pro Tip: Use a chalk line to keep underlayment straight, it’s a small step that makes panels align better later.
Step 2: Lay Starter Panels
- Start at one end of the roof, usually the bottom-left corner. Place the first panel, ensuring it overhangs the drip edge by 1 inch.
- Check alignment with a level, misaligned panels cause headaches later.
- Secure the panel with screws at 12-18 inch intervals along its edge, using a drill with a torque setting to prevent over-tightening.
Step 3: Fasten Panels Securely
- Overlap each new panel with the previous one, following the manufacturer’s specs (usually 1-2 inches).
- Use screws with rubber washers, placing them in the flat part of the panel, not the ribs, to prevent leaks.
- Troubleshooting: If panels don’t align, check your roof deck for unevenness. Shim low spots with thin plywood.
Step 4: Install Flashing
- Add flashing around chimneys, vents, and valleys. Cut flashing to fit snugly and seal with butyl tape or silicone caulk.
- For tricky areas like chimneys, use step flashing for a watertight seal. I saw a buddy struggle with a leaky chimney flashing; taking time here saves headaches.
Step 5: Add Ridge Caps and Seal
- Install ridge caps along the roof’s peak to cover panel ends. Secure with screws and seal seams with caulk.
- Double-check all joints and edges for gaps, sealing with high-quality silicone for durability.
Advanced Tips for Pros
- Use a string line across the roof to ensure panels stay straight over long runs.
- Pre-drill screw holes for faster installation, especially on large projects.
- Check local codes; some areas require specific fastener spacing or flashing types.
Common Mistakes to Avoid
Even experienced roofers make mistakes. Here’s how to dodge them:
- Over-tightening Screws: Crushes the rubber washer, causing leaks. Use a torque-controlled drill.
- Skipping Underlayment: Saves time but invites water damage. Always use it, especially in wet climates.
- Poor Ventilation: Traps heat, warping panels. Ensure vents are clear before starting.
- Misaligned Panels: Throws off the entire roof. Double-check the first panel’s alignment.
- Ignoring Flashing: Skimping here leads to leaks around chimneys or vents. Invest in quality flashing.
If you spot a mistake, fix it early. For example, loose screws can be re-tightened, but misaligned panels may need to be removed and reset.
Post-Installation Care and Maintenance
A metal roof is low-maintenance, but a little care goes a long way. Here’s how to keep it in top shape:
- Annual Inspections: Check for loose screws, damaged panels, or debris buildup. Tighten or replace as needed.
- Cleaning: Remove leaves and dirt with a soft broom. Use a mild, non-toxic cleaner to avoid damaging coatings.
- Snow and Ice: In snowy areas, clear heavy snow with a roof rake to prevent overloading.
- Warranty Documentation: Keep records of your installation, including receipts for materials, to support warranty claims.
Most metal roofs come with 20-40 year warranties on coatings. Regular checks ensure you catch issues early, maximising your roof’s lifespan.
Why Trust Pro Craft Home Products?
As Toledo’s trusted roofing contractor, Pro Craft Home Products brings years of experience to every project. From historic homes in the Old West End to modern builds in Perrysburg, we know what it takes to install a metal roof that stands up to Ohio’s weather. Ready to skip the hassle? Contact us for a free quote and let our team handle your installation with precision.
Conclusion
Installing a metal roof is a rewarding project that boosts your home’s value, durability, and eco-friendliness. With the right tools, careful planning, and our step-by-step guide, you can achieve a professional-quality result that lasts for decades. Whether you’re braving a DIY install or leading a crew, our tips, tailored for different climates and skill levels, will help you nail the job.
Ready to get started? Measure your roof, gather your materials, and dive in. Have questions or tips from your roofing projects? Contact us, we’d love to hear from you!


Leave a Reply