
How Metal Roofing Is Installed in Toledo Ohio | Pro Craft
Toledo homeowners searching how metal roofing gets installed are not planning to do it themselves. They want to know what a certified contractor actually does on their roof so they can tell the difference between a crew doing it right and a crew cutting corners. This is that guide. Every step below is how Pro Craft installs metal roofing in Toledo as a Roser Certified installer and Decra Partner in Quality. Not how it is done generically. How it is done correctly in northwest Ohio’s specific climate.
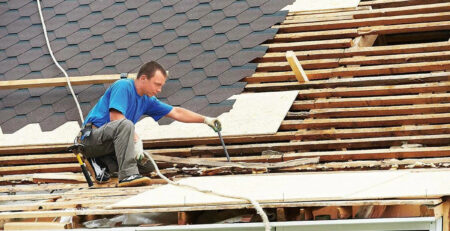
Full Tear-Off Before Anything Else
Most Toledo homeowners ask whether metal panels can go over existing asphalt shingles. The answer is technically yes in limited circumstances and practically no for Toledo homes. Existing shingles trap moisture between the panel and the deck. Toledo’s freeze-thaw cycling from November through March expands that trapped moisture and stresses the panel attachment from below every single winter. Pro Craft performs full tear-off on every metal roofing installation in Toledo. New panels go down on a clean, inspected deck only.
After tear-off, every section of decking is inspected and photographed before anything is ordered or installed. Soft spots, moisture staining, and board sheathing gaps that cause oil-canning under metal panels are documented, shown to the homeowner, and priced separately before any additional work is authorized. On older Toledo homes in neighborhoods like Old West End and Birmingham, partial decking replacement is the rule, not the exception.
Underlayment Rated for Metal, Not Asphalt
Standard felt paper and lightweight synthetic underlayment for asphalt shingles are the wrong products under metal panels. A metal surface in direct Toledo summer sun reaches temperatures that degrade standard underlayment at the contact points. In winter, condensation forms on the underside of cold metal panels when warm attic air contacts the panel from below. The underlayment has to handle both.
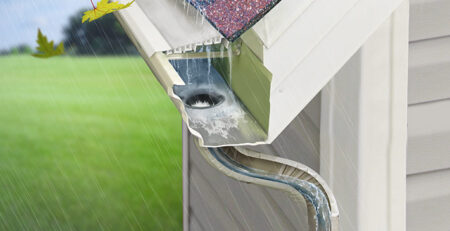
Pro Craft installs synthetic underlayment products rated specifically for metal roofing on every Toledo installation. Ice and water shield goes down at every eave to a point at least 24 inches inside the interior wall line per Ohio code, extended through every valley and around every penetration. This is not an upgrade. It is standard practice on every job because Toledo receives 40 to 60 inches of lake-effect snow annually and ice dams are a real mechanism of water entry on any roofline with insufficient coverage at the eave.
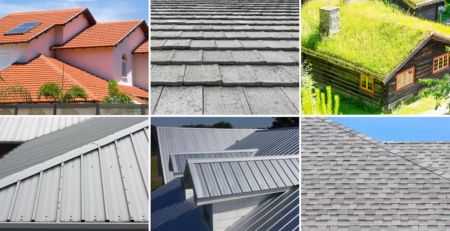
Standing Seam Panel Installation and Thermal Movement
Standing seam panels run vertically from eave to ridge in continuous lengths. Every fastener is concealed inside the raised seam between panels. No exposed fastener touches the roof surface. This eliminates the rubber washer failure that causes leaks on exposed fastener systems after 15 to 20 Toledo winters.
What most homeowners do not know is that standing seam panels are designed to move on their clips as temperature changes. Toledo’s annual temperature range from below zero in January to above 90 in July means a standing seam panel changes length measurably between seasons. Pro Craft installs Roser standing seam panels using the clip spacing and seam engagement depth that accommodates this movement correctly. A crew that fixes panels too rigidly or spaces clips incorrectly creates stress points that cause seam failure and panel creaking within the first five years. That is why Roser Certified installation is not a marketing label. It is a documented installation standard that the warranty depends on.
Stone-Coated Metal Panel Installation
Stone-coated metal roofing is installed in overlapping courses from the eave to the ridge, similar to asphalt shingles in sequence but executed differently. Each panel overlaps the one below and is fastened through the nail hem at the top of the course. The stone granule surface that makes these panels look like dimensional shingles from the street is bonded to the steel substrate and does not peel, fade, or blow off under Toledo wind events the way asphalt granules do.
Pro Craft installs Decra stone-coated metal systems as a Decra Partner in Quality. The critical details are: a correct course offset to align panel seams, a correct overlap depth to maintain the weather seal across Toledo’s full temperature range, and tight flashing integration at every valley, chimney, and penetration. These details are what separates a Decra-certified installation from an uncertified crew buying the same panels and assuming it installs like asphalt.

Flashing That Actually Works in Toledo’s Climate
Flashing on a metal roof is not the same product used on asphalt shingles. A chimney on a standing seam roof requires step flashing that integrates with the concealed clip system rather than weaving between shingle courses. A valley on a stone-coated system requires a valley pan that matches the granule profile of the surrounding panels. Pipe boots require flexible collar products designed specifically for metal panel profiles that expand and contract with the panel rather than tearing at the collar edge under thermal cycling.
Pro Craft fabricates custom flashing on site for every Toledo metal roofing installation. Every flashing detail is photographed before panels cover it so the homeowner has a permanent record of what is under the finished surface. This is the documentation that matters when a warranty claim is filed five years from now. Request a free metal roofing assessment or call 419.475.9600.
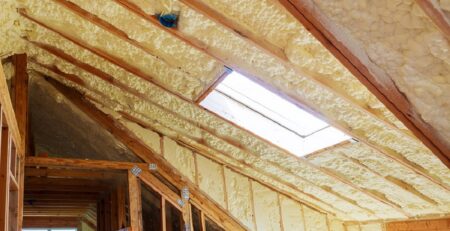
Ridge Cap and Ventilation
The ridge is the highest thermal stress point on any metal roof installation. Toledo’s temperature range produces more linear panel expansion at the ridge than anywhere else on the roof because the panels are longest there. Ridge cap on a standing seam system uses the same concealed fastener geometry as the field panels. Ridge cap on stone-coated uses purpose-made hip and ridge pieces that match the granule surface of the field panels.
Ridge venting on a metal roof requires a baffled design that prevents wind-driven rain and snow from entering at Toledo’s sustained wind speeds. The vent opening must be sized correctly for the attic’s net free ventilation area or the shingle warranty is voided before the first winter. Pro Craft assesses the existing ventilation configuration before installation and confirms the ridge vent meets Ohio code requirements and the manufacturer’s ventilation specifications on every job.
The City of Toledo Permit and Inspection
Every metal roofing replacement in Toledo requires a permit through the City of Toledo Division of Building Inspection Services. The permit inspection confirms ice and water shield coverage, underlayment installation, attic ventilation adequacy, and flashing at penetrations. This inspection is what holds the contractor accountable for the work that is now under the panels and cannot be seen from outside.
Pro Craft handles all permit applications for metal roofing installations throughout Toledo and Lucas County. The permit fee runs $355 to $500 depending on roof size and is included in every written estimate. A contractor who suggests skipping the permit on a metal roofing installation is telling you they do not want that inspection to happen.
What Questions to Ask Before Signing
Most Toledo contractors who offer metal roofing are not manufacturer-certified. They buy the same panels Pro Craft installs and assume a similar installation process. The warranty difference is significant.
Are you Roser Certified? This is the manufacturer certification for Roser standing seam systems. Certified installers can offer the full 50-year Roser warranty. Non-certified cannot, regardless of what materials they use.
Are you a Decra Partner in Quality? Same question for stone-coated systems.
What underlayment do you use under metal? The correct answer names a product rated specifically for metal roofing. Standard felt paper or asphalt-rated synthetic is the wrong answer.
How do you handle thermal expansion at the ridge? A contractor who cannot answer this in specific terms has not installed enough metal roofing to understand what Toledo’s temperature range does to a standing seam system over time.
Pro Craft answers every one of these with documentation before any contract is signed. BBB A+ rated since 2005. Excellence Award 2019 to 2025. Own crews on every job. Call 419.475.9600 or request a free assessment online.

Frequently Asked Questions
Can metal roofing be installed over existing shingles in Toledo?
Technically yes in limited circumstances. Practically no for Toledo homes. Existing shingles trap moisture between the panel and the deck. Toledo’s freeze-thaw cycling expands that moisture and stresses the panel attachment system every winter. Pro Craft performs full tear-off on every metal roofing installation. New panels go on a clean, inspected deck only.
How long does metal roof installation take in Toledo?
One to three days on most Toledo residential homes. Simple rooflines with few penetrations are completed in one day. Complex rooflines with multiple dormers, chimneys, and penetrations take two to three days. Significant decking repair scope discovered during tear-off adds time. Pro Craft communicates timeline changes before the installation date.
What is a Roser Certified installer and why does it matter?
Roser Certified is the manufacturer certification for Roser standing seam systems. It requires documented installation training and ongoing performance standards. Certified installers can offer the full 50-year Roser manufacturer warranty. Non-certified contractors installing the same panels cannot offer this warranty regardless of experience. Pro Craft holds Roser Certified installer status. Call 419.475.9600.
How much does metal roof installation cost in Toledo?
Standing seam runs $16 to $30 per square foot installed, totaling $25,000 to $40,000 on a standard Toledo home. Stone-coated metal runs $28,000 to $45,000. Permits add $355 to $500. Decking repairs add $75 to $150 per sheet and are documented with photos before proceeding. Pro Craft provides free written estimates. Call 419.475.9600.
Does metal roofing need a permit in Toledo?
Yes. Metal roofing replacements require a permit through the City of Toledo Division of Building Inspection Services. The permit inspection covers underlayment, ice and water shield, attic ventilation, and flashing. Pro Craft handles all permit applications and includes the fee in the written estimate.
Why does underlayment matter on a Toledo metal roof?
Standard felt paper and asphalt-rated synthetic underlayment degrade under the heat metal panels reach in Toledo summers and do not resist the condensation that forms on cold metal panel undersides in winter. Pro Craft installs underlayment rated specifically for metal roofing applications on every Toledo installation.


Leave a Reply