The Roof Installation Process in Toledo, Ohio: Every Step Explained
A roof installation in Toledo, Ohio follows this sequence: pre-installation inspection and permit, full tear-off of existing material, decking inspection and repair, drip edge installation, ice and water shield installation per Ohio code, synthetic underlayment, starter strip, shingle installation with wind-rated nailing, ridge cap, flashing at every penetration and transition, final inspection, debris cleanup including magnetic nail sweep, and post-installation walkthrough with the homeowner.
From tear-off to cleanup, most Toledo residential roof replacements are completed in one day. Complex roofs with multiple penetrations, steep pitches, or significant decking repairs run into a second day.
Pro Craft Home Products has been installing roofs across Toledo and northwest Ohio since 1952. Every step below reflects how Pro Craft installs every roof. Not how the industry generally works. How we specifically work on every job.
What Happens Before the Crew Arrives
Most homeowners think the roof installation starts when the crew pulls into the driveway. The work that happens before that day determines how smoothly the installation goes and whether the permit inspection passes the first time.
Permit application. Pro Craft submits the permit application to the City of Toledo Building Inspection Division or the appropriate jurisdiction for every full replacement before scheduling the installation date. Toledo roofing permits total $355 to $500 depending on roof size, covering the base permit fee, Ohio processing fee, and square footage charges. The permit is in hand before any crew member steps on the roof. Any contractor who starts work without a permit is operating outside Ohio building code and skipping the inspection that confirms the installation meets current requirements.
Materials delivery and staging. Shingles, underlayment, ice and water shield, drip edge, flashing stock, and ridge cap are delivered and staged before installation day. For a standard Toledo residential replacement, Pro Craft confirms material delivery the day before the installation date so the crew is not waiting on a delivery truck while the old roof is open.
Pre-installation homeowner preparation. Pro Craft asks homeowners to remove fragile items from walls adjacent to the work area, move vehicles from the driveway, and provide access to the attic for ventilation assessment during tear-off. Roof installation creates vibration through the structure. Picture frames, mirrors, and light fixtures on interior walls can be affected.
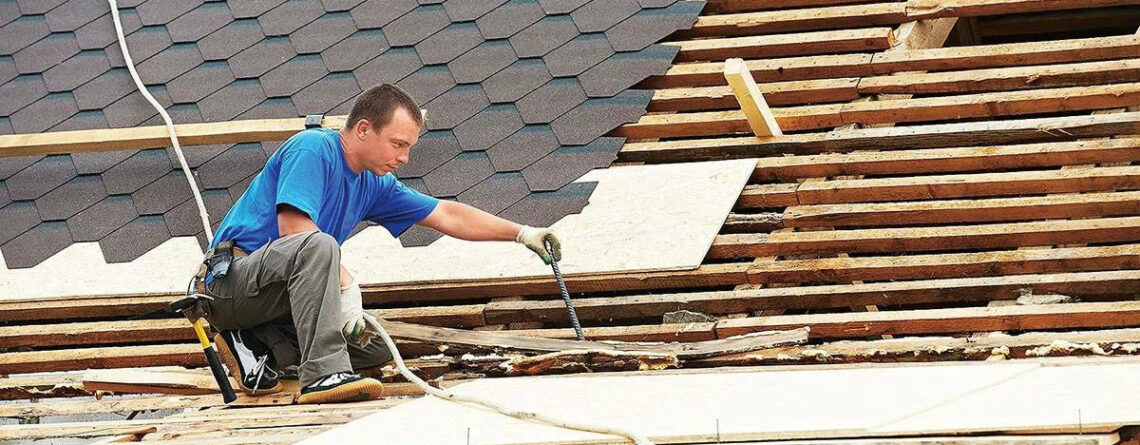
Step 1 — Full Tear-Off
Pro Craft performs full tear-off on every replacement. No overlays. Laying new shingles over old shingles violates Ohio building code in most full replacement scenarios, adds weight to the roof structure, traps moisture between the old and new layers, and prevents proper inspection of the decking underneath.
The tear-off crew removes all existing shingles, ridge cap, and underlayment down to the bare decking. All material is immediately loaded into a dump trailer or waste container staged at the property. We do not pile old shingles on the ground or in the driveway for cleanup later. The debris leaves the property the same day.
Why this matters for Toledo homes specifically. Older Toledo homes in neighborhoods like Old West End, Birmingham, and Library Village were often re-roofed multiple times over their 80 to 100-year history without full tear-off. When Pro Craft tears off a roof on one of these homes, we sometimes find two or three layers of old material that previous contractors laid over without removing. Multiple layers of old material trap decades of moisture and hide extensive decking damage. Full tear-off is the only way to see what is actually underneath.
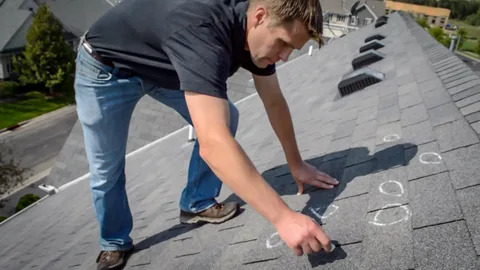
Step 2 — Decking Inspection and Repair
The decking inspection is the most important step in the entire installation and the one most contractors rush through or skip entirely. Once the old material is removed, every section of decking is visible and accessible. This is the only opportunity in the project to find moisture damage, soft spots, rot, improper original installation, and sections that do not meet current Ohio building code for fastening or thickness.
Pro Craft’s crew walks every section of decking after tear-off. Any section that is soft when pressed, visibly rotted, shows dark moisture staining, or has nail points pulling through the surface is marked and photographed. We photograph every damaged section, show the homeowner the photos, and get written approval before pricing any additional decking repairs. Nothing gets covered without the homeowner seeing what we found.
What we find on Toledo homes. Homes built in the 1920s through 1950s in Toledo frequently have original board sheathing decking rather than plywood or OSB. Board sheathing develops gaps as boards dry out over decades, allowing wind-driven snow to infiltrate the roof assembly in winter. Sections adjacent to chimney bases and valleys are the most common moisture damage locations on older Toledo homes. Newer homes with OSB decking sometimes have edge swelling from moisture infiltration at the eave line, particularly where ice dams have been pushing water under shingles repeatedly over multiple winters.
Decking repair material and cost. Pro Craft replaces damaged sections with 7/16-inch OSB or 15/32-inch plywood depending on the existing decking configuration. Decking repairs in Toledo run $75 to $150 per sheet of material and labor. The repair cost is separate from the original estimate and is invoiced only for what was actually found and approved.
Step 3 — Drip Edge Installation
Drip edge is a metal flashing that runs along the eave edge and rake edge of the roof. It directs water away from the fascia board and into the gutter rather than running behind it. Ohio building code requires drip edge on all new roofs and replacement roofs.
Pro Craft installs drip edge at the eave before the ice and water shield goes down, and at the rake edge after the underlayment is installed. The sequence matters. Eave drip edge goes under the ice and water shield. Rake drip edge goes over the underlayment. This sequencing ensures water is always directed onto the drip edge surface rather than behind it at any transition point.
Drip edge gauge matters. Lightweight 26-gauge drip edge bends and pulls away from the fascia under ice load in Toledo winters. Pro Craft installs heavier gauge drip edge that maintains its profile through freeze-thaw cycling.
Step 4 — Ice and Water Shield Installation
Ohio building code requires ice and water shield from the eave edge to a point at least 24 inches inside the interior wall line on all residential roof replacements in Toledo. This is not optional. It is a code requirement on every permitted replacement.
Ice and water shield is a self-adhering rubberized asphalt membrane that seals around nail penetrations. When a nail is driven through it, the membrane seals against the nail shank and prevents water from traveling down the nail into the decking. This matters specifically in Toledo because ice dams force water under the first two or three shingle courses every winter on homes without adequate attic insulation. The ice and water shield is the last line of defense against that water reaching the decking.
Where Pro Craft extends beyond code minimum. Ohio code minimum requires ice and water shield in the first 24 inches inside the wall line. On Toledo homes with complex rooflines, Pro Craft extends ice and water shield through every valley, around every chimney base, and at every wall-to-roof transition. These are the points where gravity alone does not protect against water intrusion on a Toledo roof. Valleys collect water and debris. Chimney bases create dam points where water pools during heavy rain events. Extending ice and water shield at these locations is standard Pro Craft practice on every Toledo installation.
Step 5 — Underlayment Installation
Underlayment is the secondary moisture barrier installed over the decking before shingles go on. It provides temporary weather protection if rain catches the roof mid-installation and serves as a backup water barrier if shingles are ever damaged.
Pro Craft installs synthetic underlayment on every Toledo replacement. Synthetic underlayment is lighter, stronger, more tear-resistant, and more UV-stable than traditional felt paper. It does not absorb moisture and wrinkle under Toledo’s summer humidity the way felt paper does, which prevents shingle distortion above the buckled underlayment. Synthetic underlayment also provides better traction for the installation crew, which matters on steep-pitched Toledo bungalow roofs where footing is a safety consideration.
Underlayment is lapped correctly at every course overlap and sealed at penetrations. A lapped underlayment that is not sealed at the lap edge allows wind-driven rain to enter laterally under the lap during Lake Erie storm events.
Step 6 — Starter Strip and Shingle Installation
The starter strip is a pre-cut shingle course that runs along the eave edge before the first full shingle course is installed. It seals the eave edge and prevents wind uplift at the most vulnerable point on the roofline. Toledo wind events off Lake Erie regularly exceed 60 mph. A roof installed without a proper starter strip fails at the eave edge first.
Nailing pattern and placement. This is where Toledo homeowners should pay close attention when evaluating contractors. Pro Craft installs Owens Corning Duration shingles using the SureNail technology nailing zone, a woven reinforcement strip that runs across the shingle face at the correct nailing point. Nails driven through the SureNail strip achieve the maximum wind resistance rating for the shingle. Nails driven outside this zone, whether too high or too low, compromise the wind resistance rating regardless of how many nails are used.
For standard architectural shingle installation in Toledo, Pro Craft uses six nails per shingle rather than the four-nail minimum. The additional two nails per shingle significantly increase wind uplift resistance on exposed Toledo properties. Six-nail installation is standard Pro Craft practice, not an upgrade.
Why nailing matters for Toledo specifically. The Ohio AG and roofing industry oversight bodies have documented roof failures in the Toledo market from improper nailing patterns by crews who were not trained on the specific nailing requirements of the materials they installed. Nails driven too high on the shingle, called high-nailing, leave the bottom half of the shingle unsecured. The tab lifts in wind events, water enters under the lifted tab, and the roof fails years before the rated lifespan. This failure pattern is common on roofs installed by subcontracted crews who move fast and do not verify nailing placement on each course.
Shingle coursing. Each course is offset from the one below by the manufacturer’s specified exposure. Courses are snapped with a chalk line to maintain alignment. A roof with inconsistent course alignment does not just look wrong. Misaligned courses create irregular water channels that concentrate flow in specific paths, increasing wear at those points.
Step 7 — Ridge Cap and Ridge Vent Installation
The ridge cap is the final shingle course that covers the peak of the roof. It is also the most exposed point on the entire installation. Ridge cap shingles on a Toledo roof take direct wind exposure from every direction and bear the full weight of any ice and snow that accumulates at the peak.
Pro Craft installs Owens Corning hip and ridge cap shingles that are heavier and thicker than standard shingles cut and folded at the ridge. Purpose-made ridge cap carries a specific wind rating and is warranted independently of the field shingles. Field shingles cut at the ridge and folded are not ridge cap. They are a shortcut that fails faster than purpose-made cap under Toledo wind and ice conditions.
Ridge vent installation. If the roof has a ridge vent for attic ventilation, the ridge board is cut to the specified width before cap installation and the ridge vent channel is installed before cap shingles go on. A closed ridge with no vent, or a ridge vent that is covered incorrectly by cap shingles, defeats the attic ventilation system entirely. Pro Craft assesses the existing attic ventilation configuration during tear-off and confirms the ridge vent is correctly sized and functioning before the roof is closed.
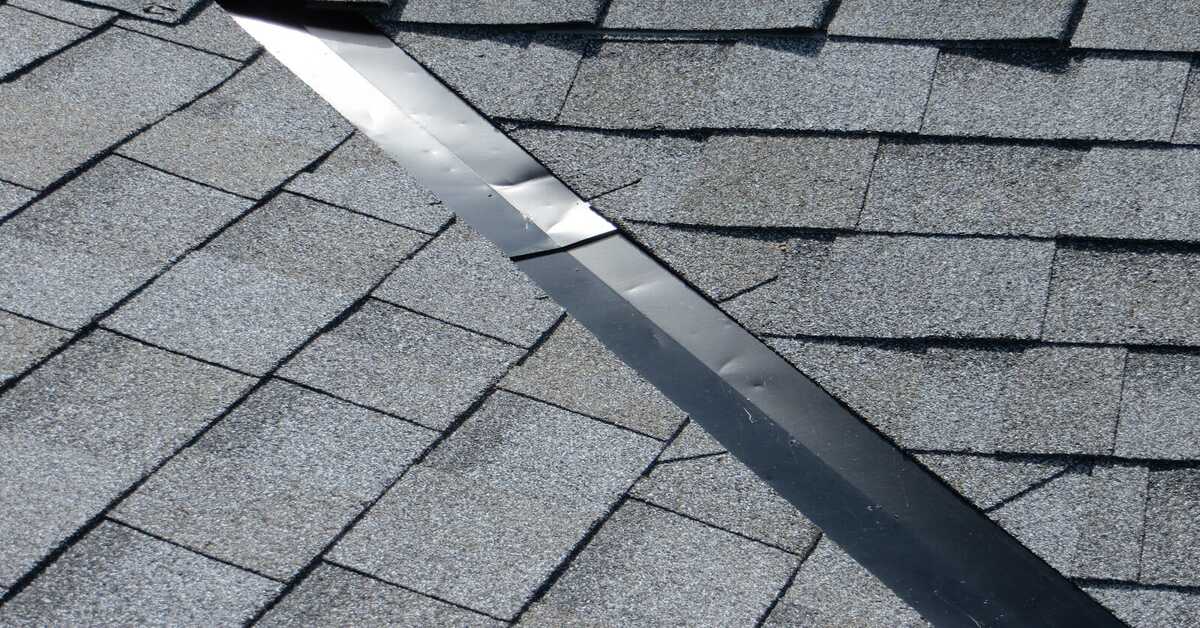
Step 8 — Flashing Installation at Every Penetration
Flashing is the metal transition material that seals every point where the roofline meets a vertical surface or penetration. Chimneys, skylights, pipe boots, dormer walls, and roof-to-wall transitions all require correctly installed flashing. These points are where the majority of active leaks on Toledo roofs originate.
Chimney flashing. Correct chimney flashing has two components: step flashing woven into the shingle courses along the sides of the chimney and counter flashing set into the mortar joints of the chimney face. The counter flashing overlaps the step flashing and prevents water from running behind the step flashing at the brick face. Many Toledo roofs have only one component installed. Tar applied to a chimney base is not counter flashing. It is a temporary sealant that fails within a few freeze-thaw cycles.
Pipe boots. Every plumbing vent stack that penetrates the roof requires a rubber pipe boot collar that seals against the pipe. Pipe boot rubber hardens and cracks under Toledo’s temperature cycling. Pro Craft replaces pipe boots on every full replacement regardless of whether they show visible damage at tear-off. The rubber boots on a 20-year-old Toledo roof that has been through 20 winters of freeze-thaw cycling are at end of life. Leaving them in place on a new roof installation creates an active leak point within the first three to five years of the new roof’s life.
Skylights. Skylight flashing requires integrated step flashing at the sides and a saddle at the upper edge that directs water around the skylight rather than against the upper frame. Improperly flashed skylights are the second most common source of active leaks on Toledo homes after chimney failures.
Step 9 — Final Inspection, Debris Cleanup, and Magnetic Nail Sweep
After installation is complete, Pro Craft’s crew supervisor walks the full roof before leaving the property. Every ridge cap nail is checked. Every flashing seal is inspected. Pipe boot collars are confirmed seated correctly against the pipe surface. Valley alignment and shingle exposure are verified.
Debris cleanup. All packaging, old shingle material, cut-offs, and construction debris are removed from the property. Gutters are cleared of granules and shingle fragments from the installation. The surrounding ground area is walked for loose nails and debris.
Magnetic nail sweep. Pro Craft uses a rolling magnetic nail sweeper on every completed job. The sweeper collects roofing nails that have fallen to the ground during installation. A standard Toledo residential replacement uses between 400 and 600 pounds of shingles per square, each fastened with six nails. Some of those nails miss the target or bounce during installation. A magnetic sweep is the only reliable method for collecting them before a homeowner, child, or pet encounters them.
Post-installation homeowner walkthrough. Pro Craft walks through the completed installation with the homeowner before the crew leaves. We photograph the completed roof from the ground and from the attic at the eave to show ice and water shield coverage. The homeowner sees the finished job, receives the written warranty documentation, and signs off on completion before final payment is collected.
Permit Inspection After Installation
Every Toledo roof replacement permitted through the City of Toledo Building Inspection Division or the applicable jurisdiction requires a post-installation inspection by the building department. Pro Craft schedules this inspection as part of the project scope.
The inspector confirms: ice and water shield was installed to code, underlayment is correctly lapped, drip edge is installed at eave and rake, ventilation meets Ohio code requirements, and the visible installation meets IRC R905 standards. If the installation passes, the permit is closed. If it does not pass, the contractor is required to make corrections before the permit can close.
Pro Craft’s installations pass permit inspection the first time. A contractor who skips the permit is avoiding this accountability step. That is the reason permits get skipped on Toledo roofing jobs.
How Long Does a Roof Installation Take in Toledo
Most standard Toledo residential roof replacements are completed in one day from tear-off to cleanup. The typical timeline for a 2,000 to 2,500 square foot single-story home is six to eight hours of active work. Complex roofs with multiple dormers, chimneys, skylights, or steep pitches take longer. Roofs with significant decking repairs discovered during tear-off extend into a second day.
Weather delays. Pro Craft monitors weather in the days leading up to the scheduled installation date. We do not install in rain because wet decking and underlayment create moisture issues that affect the installation quality. We do not install asphalt shingles in temperatures below 40 degrees Fahrenheit because the shingle adhesive does not seal properly in cold conditions. Toledo’s spring and fall weather requires flexibility in scheduling around these conditions. Pro Craft communicates schedule changes directly to the homeowner as soon as the forecast changes.
What Roof Installation Costs in Toledo, Ohio in 2025
Based on current Toledo market data and Pro Craft’s 2025 installation pricing:
Asphalt shingle replacement runs $7,000 to $15,000 for a typical Toledo residential home. The average Toledo project runs $8,000 to $12,000 for a standard single-story home with Owens Corning architectural shingles. Basic asphalt shingle installation runs $4 to $6 per square foot. Architectural shingles run $5 to $7 per square foot.
Metal roofing runs $14,000 to $28,000 or more depending on panel style and home size. Standing seam runs $16 to $30 per square foot installed. Stone-coated metal runs $28,000 to $40,000 on a standard home.
Decking repairs run $75 to $150 per sheet of plywood or OSB for materials and labor. Priced separately after inspection during tear-off.
Permit fees run $355 to $500 for a standard Toledo residential replacement. Included in Pro Craft’s written estimate.
Gutters replaced at the same time as the roof cost less in total labor than scheduling separately. Pro Craft provides a combined scope estimate when both are needed.
Request a free written estimate from Pro Craft or call 419.475.9600.
What to Watch for During Installation
Homeowners who are present during the installation can observe a few things that tell them whether the job is being done correctly without getting on the roof.
Debris management. A crew that piles old shingles in the driveway or yard rather than loading them directly into a waste container is taking a shortcut that shows up elsewhere in the job.
Nailing gun speed. An installation crew moving faster than one shingle every few seconds is likely high-nailing. Correct nailing placement on each shingle requires brief visual confirmation that the nail hit the SureNail zone before moving to the next fastener.
Flashing attention. Watch how much time the crew spends at the chimney, pipe boots, and valleys. These points require more time than open field shingle courses. A crew that moves through these areas at the same speed as open field installation is not spending the time required to do them correctly.
Cleanup cadence. A professional crew clears debris progressively throughout the day rather than leaving it until the job is complete.
After Your Roof Is Installed
The roof installation is complete but there are things to confirm before the crew leaves and in the first year after.
Before the crew leaves: walk the attic with a flashlight and confirm no daylight is visible through the deck. Check that gutters are clear of installation debris. Confirm the permit inspection is scheduled and you know when it will occur.
In the first year: check the attic after every significant rain event to confirm there are no active leaks. Keep gutters clear so water drains away from the roof edge properly. Confirm the permit was closed by the building department after the inspection.
At the five-year mark: have a professional inspection done to confirm all flashing is properly sealed and no shingles have lifted at the edges. This inspection costs nothing with Pro Craft and catches the minor issues that become expensive repairs if left until year ten.
Pro Craft Roof Installation in Toledo, Ohio
Pro Craft Home Products installs roofs in Toledo using the process described above. Every step. On every job. The same crew that starts your roof finishes it. Pro Craft employees, not subcontractors. The same supervisor who walks the job before the crew leaves is the person you call if a question comes up two years from now.
BBB A+ rated since 2005. Owens Corning Platinum Preferred. Roser Certified. Decra Partner in Quality. Over 10,000 roofs installed across Toledo and northwest Ohio since 1952. Phones answered 24 hours a day at 419.475.9600.
Request a free estimate or learn more about roof replacement in Toledo, asphalt shingle roofing, metal roofing, and residential roofing services.
Frequently Asked Questions
How long does a roof installation take in Toledo, Ohio?
Most Toledo residential roof replacements are completed in one day from tear-off to cleanup. A standard 2,000 to 2,500 square foot single-story home takes six to eight hours. Complex roofs with multiple penetrations or significant decking repairs extend into a second day. Weather delays occur when temperatures drop below 40 degrees or rain is forecast. Pro Craft communicates schedule changes directly before the installation date.
What is the roof installation process step by step?
The Pro Craft roof installation process in Toledo follows this sequence: permit application, full tear-off, decking inspection with photos, drip edge installation, ice and water shield per Ohio code, synthetic underlayment, starter strip, shingle installation with six-nail wind-rated pattern, ridge cap, flashing at all penetrations, post-installation roof walk, debris cleanup with magnetic nail sweep, homeowner walkthrough, and permit inspection scheduling.
Does Ohio require a permit for roof replacement in Toledo?
Yes. The City of Toledo requires a building permit for all full roof replacements. Permits total $355 to $500 for a standard residential roof. Pro Craft handles all permit applications and includes the fee in the written estimate. The permit triggers a post-installation inspection that confirms the job was installed to Ohio code.
What is ice and water shield and does Toledo require it?
Ice and water shield is a self-adhering rubberized asphalt membrane that seals around nail penetrations and protects the decking from water intrusion at the eave. Ohio building code requires it from the eave to at least 24 inches inside the interior wall line on all residential roof replacements. In Toledo’s freeze-thaw climate, Pro Craft extends coverage through valleys and around all penetrations as standard practice.
How much does roof installation cost in Toledo, Ohio in 2026?
Asphalt shingle replacement in Toledo runs $7,000 to $15,000 for a standard residential home. Architectural shingles run $5 to $7 per square foot installed. Metal roofing runs $14,000 to $28,000 depending on system type. Permit fees add $355 to $500. Decking repairs run $75 to $150 per sheet and are approved separately after inspection during tear-off. Pro Craft provides a free written line-item estimate for every Toledo homeowner. Call 419.475.9600.
What is the correct nailing pattern for shingles in Toledo, Ohio?
Pro Craft installs Owens Corning Duration shingles using the SureNail technology nailing zone with six nails per shingle. Nails placed through the SureNail reinforcement strip achieve the maximum wind resistance rating for the product. High-nailing, placing nails above the manufacturer’s nailing zone, leaves the bottom half of the shingle unsecured and is one of the most common installation failures that shortens roof lifespan on Toledo homes. Toledo’s 60-plus mph wind events make correct nailing placement directly relevant to how long the roof holds.
Why does Pro Craft do a magnetic nail sweep after installation?
A standard Toledo residential replacement uses four to six hundred pounds of shingles per square, each fastened with six nails. Some nails miss the target or bounce during installation and land in the yard, driveway, or garden beds. A rolling magnetic nail sweep collects these before a homeowner, child, or pet encounters them. Pro Craft performs a magnetic sweep on every completed job as a standard part of the cleanup process.
What should I check after my roof is installed in Toledo?
Before the crew leaves: walk the attic with a flashlight and confirm no daylight is visible through the deck, check that gutters are clear, and confirm the permit inspection is scheduled. In the first year: check the attic after heavy rain events to confirm no active leaks. At five years: schedule a professional inspection to confirm all flashing is sealed and no shingles have lifted. Pro Craft provides post-installation inspections at no charge for all Toledo roofs we installed.


Leave a Reply