How to Blow Insulation in Your Attic in Toledo, Ohio
Blowing insulation into a Toledo attic involves clearing the attic floor, air sealing every penetration point, setting up baffles at the soffit vents, loading the blower machine with cellulose or fiberglass, and distributing material evenly across the attic floor to a depth that achieves R-49 to R-60 per Ohio Climate Zone 5 recommendations. Most Toledo attics can be blown in three to five hours. Most Toledo homeowners pay $1.25 to $2.50 per square foot for professional blown-in attic insulation. For a 1,200 square foot Toledo ranch attic that takes one day, the total runs $1,500 to $3,000 installed. We install blown-in insulation in Toledo Ohio with free attic assessments, written estimates, and our own crew on every job. Call 419.475.9600.
Why Toledo Attics Need Blown-In Insulation More Than Anywhere Else in Ohio
Toledo sits in Ohio Climate Zone 5. The Department of Energy recommends R-49 to R-60 for attic floors in this zone. Most Toledo homes built before 1990 have R-11 to R-19 in the attic. That gap is why Toledo homeowners deal with three specific problems every winter that homeowners in warmer Ohio markets do not face at the same severity.
Ice dams. Heat escaping through the underinsulated attic floor warms the roof deck directly above it. Snow melts on the warm deck surface and runs toward the cold eave where it refreezes into an ice ridge. That ridge backs water under the first shingle course and drives it into the decking. Every ceiling stain that appears in January or February on a Toledo home after a snow event is ice dam water intrusion in most cases. Blowing attic insulation to R-49 stops the heat loss that creates the melt cycle. It does not patch the shingle. It solves the actual problem.
High heating bills. A Toledo home with R-19 attic insulation loses heat through the attic floor for five to six months every year. The furnace runs longer to compensate for the heat loss. That cost compounds every month from November through March. Toledo homeowners who bring attic insulation from R-19 to R-49 typically reduce heating costs by 15 to 25 percent in the first full heating season.
Frozen pipes and condensation. Underinsulated attics allow outdoor cold air to reach the attic floor more effectively. In Toledo’s extended cold snaps below zero, pipes running through underinsulated attic spaces are at freeze risk. Blown-in insulation at the correct depth eliminates the temperature differential that creates this risk.
Cellulose vs Fiberglass Blown-In Insulation for Toledo Attics
Toledo homeowners choosing between cellulose and fiberglass blown-in insulation are making a decision that affects performance through Toledo’s specific temperature range and humidity conditions.
Cellulose blown-in insulation is made from recycled paper treated with fire retardant. It has an R-value of 3.2 to 3.8 per inch. To achieve R-49 in a Toledo attic with existing R-19 batt insulation, you need to add approximately 8 to 9 inches of cellulose. Cellulose settles 15 to 20 percent over time and may need topping up after 15 years to maintain target R-value. The primary advantage of cellulose in Toledo is its ability to fill irregular spaces and voids in older attic floors more completely than fiberglass. Older Toledo homes in Old West End, Birmingham, and Library Village with irregular attic floor geometry benefit from cellulose’s conforming properties.
Fiberglass blown-in insulation has an R-value of 2.2 to 2.7 per inch. To achieve R-49 with existing R-19 in a Toledo attic, you need approximately 11 to 14 inches of fiberglass. Fiberglass does not settle as significantly as cellulose over time, maintaining its R-value more consistently through a 20 to 30-year lifespan. Fiberglass is resistant to moisture absorption, which matters in Toledo’s humid spring and summer conditions in attic spaces near the Lake Erie corridor. The primary advantage of fiberglass in Toledo is moisture resistance and long-term R-value stability.
Which is right for your Toledo attic: For most Toledo homes with standard attic floor geometry and existing batt insulation in reasonable condition, fiberglass blown-in is the practical choice for long-term R-value stability. For older Toledo homes with irregular attic floors, dense-pack cellulose fills voids more completely. We assess every Toledo attic before recommending either material. Call 419.475.9600.
How Much Blown-In Insulation Does Your Toledo Attic Need
Ohio Climate Zone 5 requires R-49 to R-60 for attic floors per DOE recommendations. Here is what that means in inches of material for a Toledo attic.
Starting from zero existing insulation: Cellulose to R-49: approximately 13 to 15 inches deep Fiberglass to R-49: approximately 18 to 22 inches deep
Starting from existing R-19 fiberglass batt insulation: Add cellulose to reach R-49: approximately 8 to 9 inches Add fiberglass to reach R-49: approximately 11 to 14 inches
Starting from existing R-11 batt insulation: Add cellulose to reach R-49: approximately 10 to 12 inches Add fiberglass to reach R-49: approximately 14 to 17 inches
Most Toledo homes built in the 1950s through 1980s have R-11 to R-19 in the attic. Most Toledo homes built in the 1990s and 2000s have R-19 to R-30. Any Toledo home below R-49 is losing heat through the attic floor through every Lucas County winter.
We measure existing insulation depth and calculate the exact amount of material needed to reach R-49 during a free attic assessment. The written estimate states the specific product, depth, and R-value we are targeting before any material is ordered. Call 419.475.9600.
How to Blow Insulation in Your Attic — The Professional Process in Toledo
Understanding what a professional blown-in insulation installation looks like in a Toledo attic helps homeowners evaluate whether a contractor is doing the job correctly or cutting corners.
Step 1: Attic Assessment
Before any material is blown in, the attic is assessed for existing insulation type and depth, moisture damage or mold in the existing insulation or decking, attic ventilation adequacy including soffit intake and ridge exhaust, and air leakage points at ceiling penetrations including recessed lights, plumbing chases, and attic hatch frames.
In Toledo attics where ice dam damage has been occurring for years, the existing insulation may be wet or moldy at the eave area where ice dam water entered the structure. Blowing new insulation over wet or moldy material traps moisture and creates conditions for structural damage. We check for moisture before any installation begins.
Step 2: Air Sealing
Air sealing is the step most contractors skip entirely and the one that makes the biggest difference in thermal performance. Blown-in insulation adds R-value. Air sealing stops the air movement that carries heat through every gap in the attic floor regardless of how deep the insulation is above it.
In Toledo homes, the most significant air leakage points are recessed light fixtures that penetrate the ceiling into the attic, top plates of interior walls where the framing meets the ceiling, plumbing vent chases, attic hatch frames, and electrical penetrations. We air seal all of these with fire-rated foam and caulk before any insulation is blown in. A Toledo attic that is air sealed properly before insulation reduces heat loss more effectively than one with deeper insulation and unsealed penetrations.
Step 3: Baffle Installation
Baffles are cardboard or foam channels installed between the rafters at the eave line that maintain a clear airway from the soffit vents through the insulation layer to the attic space above. Without baffles, blown-in insulation packs against the soffit vent and blocks the intake air that the attic ventilation system needs to function correctly.
A blocked soffit vent on a Toledo home creates two problems. The attic ventilation system cannot move air through the ridge vent because there is no intake pressure from below. Moisture accumulates in the attic space because humid air from the living space below cannot be exhausted. Both problems accelerate attic moisture damage and shingle aging on Toledo homes. Baffles are installed every 16 to 24 inches along the eave before any material is blown.
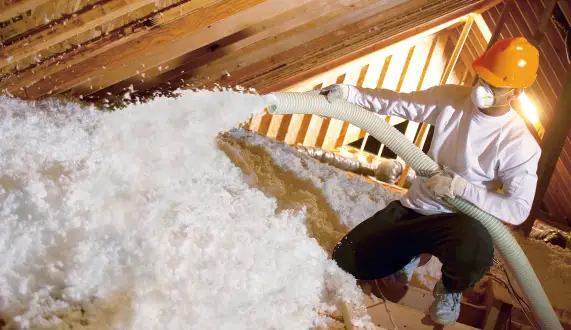
Step 4: Loading and Blowing
The blower machine is loaded with the selected insulation material. In Toledo, we typically run the blower hose from the truck or trailer through the attic hatch to avoid carrying heavy material bags up a ladder. The hose is positioned at the far end of the attic and worked back toward the hatch, distributing material evenly across the attic floor.
Blowing starts at corners, around obstructions, and in any irregular spaces that require hand placement before the open field areas are covered. Depth gauges are placed across the attic floor before blowing begins so the installer can verify depth at multiple points rather than estimating by sight.
Step 5: Depth Verification and Cleanup
After blowing is complete, depth is verified at multiple measurement points across the attic floor. The target R-value is confirmed before the crew leaves the attic space. Insulation is cleared from soffit vent airways. The attic hatch is re-insulated with a properly fitted insulated cover that does not allow heat to bypass the attic floor insulation at the access point.
Most Toledo attic insulation installations complete in three to five hours for a standard 1,200 to 1,500 square foot attic. Larger homes or attics with significant air sealing needs take longer.
H2: Can You Blow Insulation Over Existing Insulation in a Toledo Attic
Yes, with conditions. Blown-in insulation can be added directly over existing fiberglass batt insulation in a Toledo attic when the existing material is dry, free of mold, not compressed or matted, and not contaminated by pest activity.
When existing insulation should be removed first: if it is wet from ice dam water intrusion, if it shows mold growth visible to the eye, if it has been compressed or displaced by pests, or if it contains vermiculite, which was used in older Toledo homes and may contain asbestos. Vermiculite insulation in a Toledo attic must be tested before any new material is added or the existing material is disturbed. We identify these conditions during every free attic assessment before recommending removal or blow-over. Call 419.475.9600.
H2: Blown-In Insulation Cost Toledo Ohio
Blown-in attic insulation in Toledo Ohio runs $1.25 to $2.50 per square foot installed depending on existing insulation depth, target R-value, access configuration, and whether air sealing is included in the scope.
Standard Toledo ranch, 1,200 square feet, R-19 to R-49: Material and labor: $1,500 to $3,000 Completion time: one day Federal 25C tax credit: up to 30% of material cost, up to $600 per year
Larger Toledo home, 2,000 square feet, starting from R-11: Material and labor: $2,500 to $5,000 Completion time: one to two days Federal 25C tax credit applies on qualifying material costs
Air sealing addition: $200 to $600 depending on the number of penetrations requiring sealing. Air sealing before blown-in insulation reduces heat loss more than increasing insulation depth alone and is included in our standard scope on every Toledo attic installation.
We provide a free written estimate for every Toledo homeowner. The estimate states the specific product, depth, R-value target, and total cost before any commitment. Call 419.475.9600 or request a free estimate online.
H2: Blown-In Insulation and Ice Dams — The Toledo Connection
Most Toledo homeowners who call us about recurring ceiling stains after winter storms have already had the roof patched two or three times by the time they call. The patch held through summer. The stain came back in February. That is not a roofing failure. That is the ice dam cycle continuing because the attic insulation problem was never addressed.
The sequence every time: underinsulated attic lets heat escape through the ceiling, that heat warms the roof deck above the living space, snow melts on the warm deck, meltwater runs down to the cold eave overhang where no heat from below reaches, water refreezes at the eave into an ice ridge, the ridge backs water under the first shingle course, water penetrates the decking and insulation and shows on the ceiling inside.
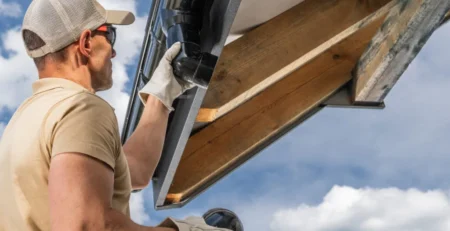
Patching the shingle does not interrupt this sequence at any point. Blowing attic insulation to R-49 interrupts it at the source by stopping the heat loss that warms the roof deck. We install blown-in attic insulation in Toledo Ohio alongside roof replacement when both are needed. Addressing both at the same time costs less in total labor than two separate projects and solves the problem permanently rather than patching the symptom.
H2: Ohio Energy Assistance Programs for Toledo Homeowners
Toledo homeowners who cannot afford blown-in attic insulation at full cost have three specific assistance options worth checking before paying out of pocket.
Ohio Development Services Agency Weatherization Assistance Program provides free weatherization services including blown-in attic insulation and air sealing to eligible low-income Toledo households through the Lucas County Community Action Agency. Income eligibility is based on household size relative to federal poverty guidelines. Applications go through the Lucas County Community Action Agency for Toledo homeowners.
Ohio HEAP provides heating assistance and in some cases funds weatherization improvements including insulation for eligible Ohio households.
Federal 25C Energy Efficiency Tax Credit covers up to 30% of qualifying insulation material costs up to $600 per year for Toledo homeowners who install blown-in insulation meeting current energy efficiency standards. The credit applies to material cost, not labor. We identify qualifying products and provide the documentation needed for tax credit applications on every Toledo installation.
We provide free written attic assessments for Toledo homeowners pursuing any assistance program application. The assessment documents existing insulation depth and R-value, which is what most program applications require. Call 419.475.9600.
H2: Pro Craft Blown-In Attic Insulation Toledo Ohio
We install blown-in insulation in Toledo Ohio with our own crew, free attic assessments, and written estimates before any commitment. Every installation includes air sealing at ceiling penetrations, baffle installation at every soffit vent, and depth verification at multiple points before we leave the attic. Most Toledo installations complete in one day.
We are the only Toledo contractor that installs blown-in attic insulation alongside roof replacement, gutter installation, vinyl siding, and replacement windows under one contractor. BBB A+ rated since 2005. Serving Toledo since 1952. Call 419.475.9600 or request a free estimate online. Phones answered 24 hours a day.
Frequently Asked Questions
How much does blown-in attic insulation cost in Toledo Ohio?
Blown-in insulation in Toledo Ohio runs $1.25 to $2.50 per square foot installed. A standard 1,200 square foot Toledo ranch attic going from R-19 to R-49 runs $1,500 to $3,000. The federal 25C tax credit covers up to 30% of qualifying material costs up to $600 per year. Free written estimate from us before any commitment. Call 419.475.9600.
What R-value does my Toledo Ohio attic need?
Ohio Climate Zone 5 recommends R-49 to R-60 for attic floors per DOE guidelines. Most Toledo homes built before 1990 run R-11 to R-19. That gap drives ice dam formation, high heating bills, and accelerated shingle aging every winter. We measure existing depth and calculate exact material needed during a free Toledo attic assessment. Call 419.475.9600.
Can blown-in insulation stop ice dams on my Toledo roof?
Yes. Ice dams form when heat escapes through an underinsulated attic and warms the roof deck. Blown-in insulation to R-49 stops the heat loss at the source and interrupts the melt cycle that creates ice dams. Patching the shingles without addressing attic insulation produces the same ceiling stain the following winter. We install blown-in insulation alongside roof replacement when both are needed. Call 419.475.9600.
Can I blow insulation over existing insulation in my Toledo attic?
Yes, when the existing insulation is dry, mold-free, not compressed, and not contaminated. When existing insulation is wet from ice dam intrusion, has visible mold, or has been displaced by pests, it should be removed before new material is added. We assess every Toledo attic before recommending removal or blow-over. Call 419.475.9600.
What is better for a Toledo attic, cellulose or fiberglass blown-in insulation?
Fiberglass blown-in is the better long-term choice for most Toledo attics. It does not settle as significantly as cellulose over time and resists moisture absorption in Toledo’s humid spring and summer conditions. Cellulose fills irregular voids more completely on older Toledo homes with non-standard attic floor geometry. We assess each attic and recommend the right material before ordering anything. Call 419.475.9600.
Does Pro Craft install blown-in insulation in Toledo Ohio?
Yes. We install blown-in attic insulation throughout Toledo and Lucas County with free attic assessments, air sealing, baffle installation, and written estimates before any commitment. Most installations complete in one day. BBB A+ since 2005. Call 419.475.9600 or request online.


Leave a Reply