The Roof Installation Process: A Complete Step-by-Step Guide
If your roof is leaking, aging, or was hit by a recent storm, you already know the anxiety that comes with facing a full replacement. Most homeowners have never watched a roof get installed from start to finish. The crew shows up, the noise starts, and a day or two later there is a new roof over your head. But what actually happens in between? What does the crew do first? What could go wrong? How do you know the job was done right?
At Pro Craft Home Products, we have been installing roofs across Toledo, Ohio and Southeast Michigan since 1952. We believe an informed homeowner is a confident homeowner. This guide walks you through every single step of the roof installation process so you know exactly what to expect, what questions to ask, and how to protect your investment before, during, and after the project.
What Happens Before Installation Day
Most homeowners think the roof installation starts when the crew pulls into the driveway. In reality, several important steps happen in the days and weeks before a single shingle is removed.
Inspection and Estimate
Every legitimate roof replacement starts with a thorough inspection. At Pro Craft, we examine your existing shingles, inspect the decking from the attic if accessible, check your ventilation, assess flashing around chimneys and vents, and measure the full roof area. This is how we build an accurate estimate with no surprises. Be cautious of any contractor who gives you a quote without getting on the roof or spending meaningful time on the inspection. A rushed estimate almost always leads to change orders and unexpected costs later.
Permits
In Ohio and Michigan, most roof replacements require a building permit. This is not optional, and a reputable contractor handles the permit process for you. Pulling a permit ensures your new roof will be inspected by a local building official and meets current code. If a contractor tells you permits are unnecessary or tries to skip them to save time, that is a serious red flag. An unpermitted roof can cause problems when you sell your home or file an insurance claim.
Material Selection and Ordering
Once you approve the estimate and select your materials, your contractor orders everything needed for the job. This includes shingles, underlayment, flashing, ridge caps, starter strips, drip edge, and any ventilation components. For asphalt shingle roofs in the Toledo and Michigan area, materials typically arrive one to two days before installation begins. If materials are delivered to your roof ahead of time, they will be placed near the ridge to distribute weight evenly.
Homeowner Preparation
Before the crew arrives, there are several things you can do to make the process smoother:
- Move vehicles out of the driveway so the crew and dumpster have full access
- Remove or secure patio furniture, potted plants, and decorative items near the house
- Warn your neighbors that there will be noise for one to two days
- Take photos off walls inside the house, as vibration from nailing can knock lightweight items down
- Keep pets indoors throughout the project, as falling debris and loose nails are a real hazard
Step 1: Setting Up the Job Site and Safety Equipment
The first thing a professional roofing crew does on installation day is set up the job site properly. This is not glamorous work, but it directly affects the safety of your crew and the protection of your property.
The crew will place tarps around the perimeter of the home to catch falling debris, old shingles, and nails. They will position a dumpster or trailer in the driveway or staging area for waste disposal. Ladders are secured and checked, and crew members put on personal protective equipment including harnesses, non-slip boots, and hard hats.
Protecting your landscaping during this step matters. A good contractor drapes boards or tarps over flowerbeds and shrubs directly below the roofline. The weight of falling shingles and the impact from dropped tools can damage plants and decorative features if the crew is not careful.
At Pro Craft, our crews work with property protection as a standard part of every job, not something you have to specifically request.
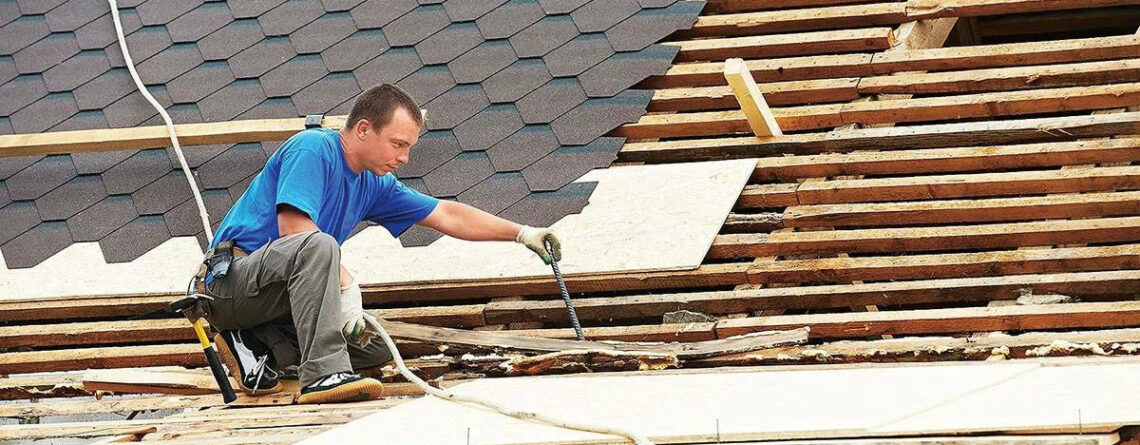
Step 2: Tearing Off the Old Roof
With the site prepared, the crew begins removing the existing roofing material. This step is called a tear-off, and it is one of the most important parts of the entire process.
Some contractors offer to install new shingles directly over existing ones, a practice called a layover or re-roof. While this saves a small amount of time and cost upfront, it creates serious problems. A layover traps moisture between the layers, adds significant weight to the structure, makes it impossible to properly inspect the decking, and typically voids manufacturer warranties on the new shingles. In most cases, a full tear-off is the right choice and the only approach we recommend as your residential roofing contractor.
The tear-off process works from the ridge downward. The crew uses roofing shovels and pry bars to strip away shingles, underlayment, and flashing in sections, feeding the debris directly into the dumpster or down a dump chute. On a standard residential roof, a crew of four to six experienced roofers can complete a full tear-off in two to four hours.
What happens to the old materials? Old asphalt shingles are taken to a designated disposal facility. In many areas, asphalt shingles are recycled into road paving material. Your contractor should confirm proper disposal as part of the project scope.
Step 3: Inspecting and Repairing the Roof Deck
Once the old roof is stripped down to bare wood, the crew inspects every square foot of the decking. The roof deck, typically made of plywood or oriented strand board (OSB), is the structural foundation that everything else is nailed into. If the deck is compromised, the new roof will not perform as it should regardless of how good the shingles are.
Inspectors look for:
- Soft spots caused by prolonged moisture exposure or old leaks
- Rotted wood that crumbles or gives way under pressure
- Delamination in plywood where the layers have separated
- Sagging sections that indicate structural issues below
- Black staining or mold that indicates chronic moisture problems
Any damaged sections are cut out and replaced with new plywood or OSB of matching thickness, typically half-inch or 5/8-inch material. These repairs are secured to the rafters with appropriate fasteners and must create a flat, solid, continuous surface before anything else goes down.
This step is where estimates sometimes change. When a contractor opens up the old roof, they occasionally find more deck damage than was visible during the pre-installation inspection. A trustworthy contractor will photograph the damage, explain the scope of repairs clearly, and get your approval before proceeding. At Pro Craft, we document everything we find and walk you through it so there are no surprises on your final invoice.
Ventilation check: While the deck is exposed, the crew also evaluates your attic ventilation system. Proper ventilation is critical for roof longevity. An attic that traps heat in summer and moisture in winter will accelerate shingle deterioration from the inside out, shortening the life of a new roof by years. If your intake vents at the soffits or exhaust vents at the ridge are inadequate, now is the ideal time to address them before the new roof goes on.
Step 4: Installing the Drip Edge
With a solid deck confirmed, the first physical component of the new roof system goes down: the drip edge. Drip edge is a metal flashing strip installed along the eaves and rakes of the roof. It serves three important purposes.
First, it directs water away from the fascia board and into the gutter, preventing water from running back under the roofing material and rotting the wood beneath. Second, it gives the underlayment and shingles a clean, straight edge to terminate against. Third, it prevents wind-driven rain from working its way under the edge of the roof during storms.
At the eaves, drip edge is installed before the underlayment. At the rakes (the sloped sides of the roof), drip edge goes on top of the underlayment. This sequence is important because it controls the direction water flows at each edge. Getting this order wrong is a common mistake made by less experienced crews, and it can lead to edge leaks that are difficult to trace.
Drip edge is required by code in Ohio and Michigan and should be included as a standard component in any roofing estimate you receive.
Step 5: Laying the Underlayment
Underlayment is the water-resistant barrier installed directly over the roof deck, beneath the shingles. Think of it as the last line of defense if water ever gets past the outer layer of your roof. It also protects the deck from moisture exposure during installation in case rain hits before the shingles are finished.
There are two primary types of underlayment used in residential roofing today:
Felt underlayment (15-lb or 30-lb): The traditional option made from asphalt-saturated felt paper. It is cost-effective and still widely used. 30-lb felt is thicker and more durable than 15-lb, and is the better choice for steeper pitches and colder climates like those we experience in Northwest Ohio and Southeast Michigan.
Synthetic underlayment: Made from woven or spun polypropylene, synthetic underlayment is lighter, stronger, and more resistant to tearing than felt. It also dries faster if it gets wet during installation, making it a strong choice for projects where weather is unpredictable. Many premium shingle warranties now require synthetic underlayment for full coverage.
Ice and water shield: Along the eaves and in roof valleys, a self-adhesive membrane called ice and water shield provides an additional layer of protection. In Ohio and Michigan where ice dams form in winter, ice and water shield is not optional. It should extend at least 24 inches past the interior wall line at the eaves, and should cover the full length of any valley. Some contractors cut corners by only installing it at the very edge. Make sure your contract specifies the full coverage required.
The underlayment is rolled out horizontally from the bottom of the roof upward, with each successive row overlapping the one below it by at least two inches to shed water. On steeper roofs, more overlap is used.
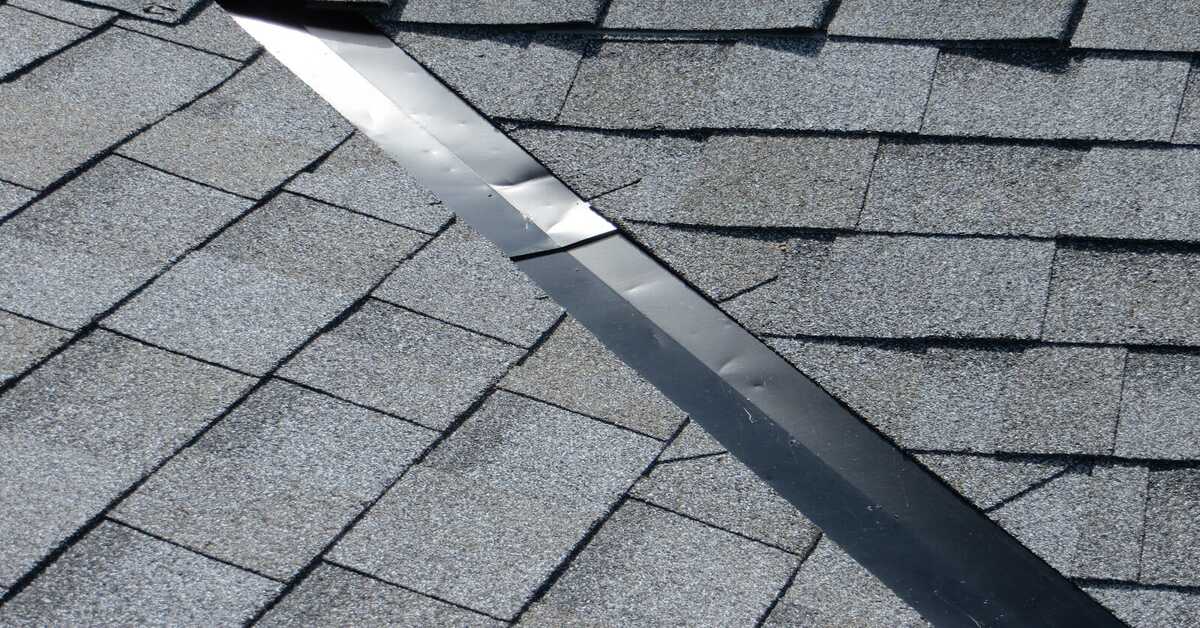
Step 6: Installing Flashing
Flashing is thin metal sheeting installed at every point where the roof surface meets another structure or penetration. This includes:
- Chimney flashing: Step flashing along the sides and counter flashing over the top
- Pipe boot flashing: Around plumbing vents and exhaust pipes
- Valley flashing: Where two roof planes meet and water concentrates
- Skylight flashing: Around the perimeter of any skylight frame
- Dormer flashing: Where dormers intersect the main roof plane
- Wall flashing: Where a roof plane meets a vertical wall
Flashing is one of the most failure-prone areas of any roof. More than half of all roof leaks occur at flashing locations rather than in the field of the shingles. The reason is that flashing requires precise measurement, cutting, bending, and sealing, and it is often the place where rushed or inexperienced crews take shortcuts.
To learn more about why flashing matters and what proper installation looks like, read our detailed guide on what flashing is in roofing.
At Pro Craft, we always use new flashing on every replacement. Reusing old flashing to save cost is a false economy since corroded or improperly fitted flashing is one of the most common sources of leaks in the first few years after a new roof is installed.
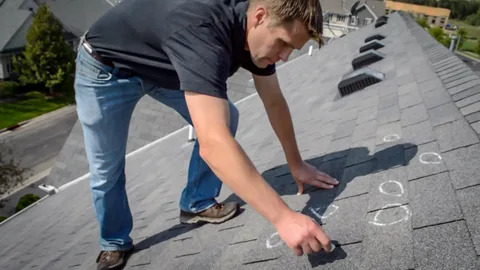
Step 7: Installing the Roofing Material
With the deck repaired, drip edge set, underlayment down, and flashing in place, the crew begins laying the roofing material. This is the step most homeowners picture when they think of roof installation, and it is where the bulk of the labor time is spent.
Starter Strip
Before the first row of shingles goes down, a starter strip is installed along the eave. The starter strip is a specially designed shingle or roll product with a sealant strip along the top. It provides a solid base for the first course of shingles and creates a wind-resistant seal at the most vulnerable edge of the roof. Skipping the starter strip is a common shortcut that can lead to blow-offs in high wind events.
Asphalt Shingles
For most residential asphalt shingle roofing installations, shingles are laid from the bottom edge of the roof upward in overlapping horizontal courses. Each shingle is offset from the one directly below it by half a tab width, creating the familiar staggered pattern. This offset is critical because it prevents water from channeling down the vertical seams between shingles.
Each shingle is secured with four to six roofing nails, placed in the nailing zone specified by the manufacturer. Nails placed too high or too low reduce the wind resistance of the shingle significantly. Your roofing crew should be following the manufacturer’s nailing pattern, especially if you want the full warranty coverage that comes with a certified installation.
Three-tab vs. Architectural Shingles
Three-tab shingles are the thinner, older-style option that creates a uniform flat appearance. Architectural shingles (also called dimensional or laminate shingles) are thicker, have a textured layered appearance, carry longer warranties (typically 30 years to lifetime), and offer significantly better wind resistance. At Pro Craft, we predominantly recommend architectural shingles for homeowners in the Toledo and Michigan area because they perform better against the wind, ice, and temperature swings common in our region.
Metal Roofing
For homeowners considering metal roofing, the installation process differs significantly. Metal panels or shingles are installed over a solid or skip-sheathed deck depending on the product type. Panels are attached with concealed or exposed fasteners, with each panel lapping over the previous one. Thermal expansion is a key consideration, so panels must be attached in a way that allows them to move slightly as temperatures change. Metal roofing typically takes longer to install per square foot than asphalt but delivers a lifespan of 40 to 70 years with minimal maintenance.
Ridge Cap Installation
The final row of shingles meets at the peak of the roof, which is capped with ridge cap shingles. Ridge caps are thicker, pre-bent shingles designed to wrap over the peak and seal the topmost edge of both roof planes. They are installed with longer nails to penetrate through both layers and into the decking below.
Ridge Vent Installation
If your home uses a continuous ridge vent for attic ventilation, a slot is cut along the peak of the roof before the ridge cap goes on. The vent cover is then installed over the slot and the ridge cap shingles go on top. A properly installed ridge vent works in conjunction with soffit vents to create continuous airflow through the attic, which is the most effective passive ventilation system available for residential roofs.
Step 8: Final Inspection, Walkthrough, and Cleanup
After all the roofing material is installed, a thorough inspection is performed before the crew breaks down the site. At Pro Craft, our project lead inspects every section of the completed roof looking for:
- Missing or improperly seated nails
- Shingles that are not fully adhered or seated
- Flashing that needs additional sealant
- Ridge cap alignment and nail coverage
- Proper overlap and offset throughout all shingle courses
- Any areas where the underlayment may be visible or improperly covered
The cleanup phase is just as important as the installation itself. Our crews use magnetic rollers and hand rakes to sweep the entire yard for nails and metal debris. Gutters are cleared of shingle granules and debris that accumulated during the tear-off. Tarps are collected and the dumpster is loaded for removal.
We then walk you through the completed roof, showing you the finished ridge, the flashing points, and the drip edge along the gutters. This is your opportunity to ask any questions about what was done, review the warranty documentation, and confirm the cleanup was completed to your satisfaction.
How Long Does Roof Installation Take?
For a typical single-family home in the Toledo and Southeast Michigan area, here is what you can realistically expect:
A standard 1,500 to 2,000 square foot ranch or two-story home with asphalt shingles takes one full day for most crews. Larger homes over 2,500 square feet, homes with complex rooflines, multiple dormers, steep pitches, or significant deck repairs may require two days. Metal roofing projects typically take two to three days due to the more involved installation method.
Weather can extend any timeline. Roofing cannot be performed safely in rain, and in Ohio and Michigan, you need a window of dry weather to complete the full installation without stopping. Your contractor should have a clear plan for weatherproofing the project if work needs to stop overnight or if rain is in the forecast.
What Does Roof Installation Cost in Toledo and Michigan?
Costs vary based on roof size, pitch, material choice, deck condition, and project complexity. Here are realistic ranges for the Toledo, Ohio and Southeast Michigan market:
Asphalt shingle replacement: $7,000 to $14,000 for a typical residential home. This range covers tear-off, standard deck repairs, underlayment, drip edge, flashing, and a quality architectural shingle with a workmanship warranty.
Metal roofing: $14,000 to $28,000 or more depending on panel style and home size. The higher upfront cost is offset by the 40 to 70 year lifespan and significantly lower maintenance requirements.
Deck repairs: Typically charged per sheet of plywood or OSB replaced, usually $75 to $150 per sheet for materials and labor. Extensive deck damage can add $500 to $2,000 to the total cost of a project.
If your roof damage is the result of a covered storm event, your homeowner’s insurance policy may cover part or all of the replacement cost. Our team has extensive experience working with insurance adjusters and can help you navigate the claims process so you get the full coverage you are entitled to.
Choosing the Right Roofing Material for Ohio and Michigan Homes
The climate in Northwest Ohio and Southeast Michigan puts specific demands on a roof that not every material meets equally. Here is a practical breakdown:
Architectural Asphalt Shingles are the most popular choice for good reason. They cost less than premium materials, are widely available, and perform reliably in our climate when properly installed. Look for products rated Class 4 impact resistance and wind ratings of 130 MPH or higher for the best protection against hail and the strong winds common in the Great Lakes region.
Metal Roofing is the best long-term investment for homeowners who plan to stay in their home for 20 or more years. Steel and aluminum roofing shed snow better than shingles, are not affected by ice dams the same way asphalt is, and do not lose granules over time. Metal roofs are an excellent option for steep-pitch homes where ice accumulation can be a significant concern.
Synthetic Slate and Shake products offer the appearance of premium natural materials at a lower weight and cost. They are worth considering for homeowners who want a distinctive look without the structural demands of real slate.
Natural Slate and Clay Tile are beautiful and extremely long-lasting but require a structurally reinforced roof framing system to handle the added weight. They are less common in our region for this reason.
Common Roof Installation Mistakes to Watch For
Even experienced crews can take shortcuts under time pressure. Here are the most common installation errors that homeowners should know about:
Improper nail placement: Nails placed too high on the shingle create a fastening problem that allows shingles to lift and separate in high wind. This is called a blow-off and it is entirely preventable with proper technique.
Skipping the starter strip: Some crews use cut-down regular shingles as a starter strip instead of the proper product. This creates a weaker seal at the eave edge.
Reusing old flashing: Old flashing that is bent, corroded, or improperly fitted should be replaced, not reused. Any contractor who proposes reusing existing flashing to reduce cost is creating a future leak point.
Inadequate ice and water shield: In our climate, ice and water shield is not just a nice addition. It is a necessary protection against ice dam damage. If your estimate does not explicitly list ice and water shield, ask about it.
Improper attic ventilation: Installing a new roof without correcting poor attic ventilation will shorten the life of the new shingles. This is one of the most common and most overlooked aspects of a proper roof replacement.
Frequently Asked Questions About Roof Installation
Do I need to be home during the installation?
You do not need to be home for the entire project, but we recommend being available at the start of the day to confirm the scope of work and at the end for the final walkthrough. If you work from home, plan to work somewhere else for the day since the noise level from nailing and tear-off is significant.
How long does a new roof last?
A quality architectural asphalt shingle roof installed correctly in our climate should last 25 to 30 years with minimal maintenance. Metal roofing can last 40 to 70 years. The actual lifespan depends heavily on ventilation, installation quality, and how well the roof is maintained over time.
What warranty will I receive?
You should receive two separate warranties: a manufacturer’s warranty on the materials themselves, and a workmanship warranty from your contractor covering the quality of the installation. At Pro Craft, we stand behind every roof we install with a written workmanship warranty.
Can I do a roof installation myself?
Technically yes, but it is not advisable for most homeowners. Roofing is physically demanding, requires working at height, involves significant safety risk, and requires knowledge of local building codes, manufacturer specifications, and proper installation sequencing. Errors in a DIY installation can void material warranties and create issues that are expensive to correct. For the investment a roof represents, professional installation from a licensed roofing contractor is the right choice for most homeowners.
What if it rains during my installation?
A legitimate roofing contractor will monitor weather forecasts and schedule your project during a window of dry weather. If unexpected rain arrives mid-installation, the crew will cover the exposed deck with tarps and resume work once conditions allow. Make sure your contract addresses how weather delays are handled.
What should I do after my new roof is installed?
In the first year after installation, check your attic after any major rain event to confirm there are no leaks. Keep your gutters clear so water drains properly away from the roof edge. Have a professional inspection done at the five-year mark to confirm all flashing is still properly sealed and no shingles have lifted. Following these steps will protect your investment and catch any minor issues before they become major problems.
Why Toledo and Southeast Michigan Homeowners Choose Pro Craft
Pro Craft Home Products has been a licensed, BBB A+ accredited roofing contractor serving Toledo, Ohio and Southeast Michigan since 1952. We are not a franchise, a storm-chaser, or a nationwide call center. We are a locally owned company with real roots in this community, and every roof we install is backed by a written workmanship warranty.
Our roof replacement process follows every step outlined in this guide with no shortcuts. Our estimates are detailed and transparent. Our crews are trained, in-house employees who take pride in their work and in leaving your property clean when the job is done.
Whether you need a full residential roof replacement, an emergency roof repair, a commercial roofing solution, or are simply ready to get a second opinion on an estimate you received, we are ready to help.
Call us at (419) 475-9600 or request a free quote online and a member of our team will be in touch within one business day.
Final Thoughts
Understanding the roof installation process does not just satisfy curiosity. It makes you a better customer, a more confident decision-maker, and gives you the tools to verify that the contractor you hire is doing the job properly. From inspection and permits before installation day, through each of the seven installation steps, to the final walkthrough and warranty documentation, every phase matters.
A roof is one of the largest single investments a homeowner makes. Doing it right the first time, with quality materials, a skilled crew, and proper installation sequencing, means you will not be doing it again for 25 to 30 years. That is the kind of result Pro Craft Home Products has been delivering to families across Northwest Ohio and Southeast Michigan for more than 70 years.


Leave a Reply